Monday, 11 July 2016

#3UP Challenge July 2016

Well hello there!

It's that time again and I was lucky enough to have my name pulled out of the hat, I love these challenges but as usual always struggle with time (not matter how long we are given!!!)

So my challenge was Ink & the Dog stamps with infusions!! Yay what joy!

Well the stamps speak for themselves, as usual top quality and PaperArtsy always seems to something for everyone. Then there are infusions.... these little babies are soooo versatile and as I love to create backgrounds I am sure they will be used on a regular basis.

First up I sprinkled Blackcurrent and A Bit Jaded (fab names as ever!) infusions onto water colour paper and spritzed with water, I then mixed some of the infusions with fresco snowflake and used it to stamp on the background, and painted a little on to some scrap water colour paper and stamped the focal image.


I then coloured some ribbon, bias binding and crinkle paper with the infusions, love the way you get bits of the walnut showing through.


I stamped my main image onto the painted watercolour paper and assembled everything but then didn't know what to do with it, eventually deciding on a wall hanging mounted with fabric, so out came the sewing machine and I ended up with this...


During this process (which took for ever as I just couldn't make up my mind what to do LOL) I also created this little card topping, love this!


and I was gutted I couldn't work this technique into a design but I will!!


 all from one application....1 - texture paste thru stencil sprinkle of infusion 2 - the negative from the first application 3 - apply more texture paste thru stencil which blends the colours together 4 - cleaning stencil with baby wipe


So anyway that's me done go take a look at all the other loveliness on the PaparArtsy Blog HERE.

Thanks for stopping by leave a message if you fancy, catch you next time.

Happy Craftin

Rebecca


Sunday, 15 May 2016

2016 Topic #9 Mono Printing {Challenge}

O my this will be the quickest post ever!
Lino printing fun to join the PaperArtsy Challenge HERE.

I'll edit and add details later!

O my that was close....just 3 minutes to spare for the deadline but linked it was LOL.


So mono printing, how exciting I thought, I used to love lino printing when I was at school, so I purchased a cheap kit with the bits and bobs and eventually last night gt round to carving.

I really wasn't sure what I wanted to do, so thought I would keep it simple and make a background to a card.

I wasn't sure the best way to make it multi-coloured, co cut my lino in half to make two so I could layer up.


I then had a play around with colours, I was gutted as I couldn't get my fresco paints to work as they just dried as soon as applied to the lino. I didn't think about mixing with anything till after the event LOL so opted for ink pads but the purple was just too strong.


As the background was quite busy I needed something bold to sit on it and came accross my ELB13 stamp set, perfect.


SO a nice simple card and these are the two lino blocks, I really enjoyed this.


Be back soon!....Thanks for stopping by and leave a message if you fancy!
Happy Craftin
Rebecca

Sunday, 8 May 2016

Let there be light...plus one!

Hi Peeps,

Here we are again, twice in two days whoop whoop!

This journal page started a couple years ago when I attended a France Papillion and was one of my mop up pages from the messy table! I have done other pages in there since but not this one, it's taken a while and I've been adding layers over the lats few weeks when time allows and I have 5 minutes.

Recently I found some IndigoBlu stamps in a sale bin which prompted me to finish it and I raided my stash for other stamps with a light theme.


The plus one... is another journal page with my new PA stamps, the only thing I had on my mind to start was that I wanted texture, which I accomplished, no heavy meaning just a play time. :)


Thanks for stopping by, leave a message if you fancy.

Happy craftin

Rebecca

Saturday, 7 May 2016

April...check

Hello peeps, hope you are all well and enjoying the little bit of sunshine we've had this lats week?

So April has been and gone... always a busy month for cards..

A couple birthdays to kick off...


Now some of the more astute of you will notice I completely plagiarised the robot design from the PA blog, I don't normally but I really liked this and was struggling for time so I do apologise most profusely.

My Uncle passed away in April a couple years ago and I always send a card to my Aunt just to show I am thinking of her.


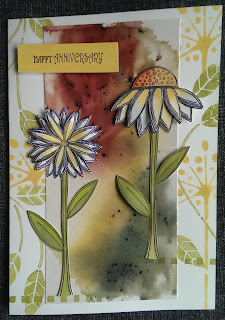
Now when you have lots of weddings all together you invariably have lots of anniversary cards to do!


Then I had a couple extras thrown in as you do, a friend asked me for a quick anniversary card for her mom & dad, and a friend had a bit of a bad day so needed a pick me up card.


Then by baby became a teenager, I just don't know where the time has gone.


Now this next card started life as the PA 'white space' challenge but didn't quite make it and I feel really bad as it still hasn't made its way to my sister in-law, although she has been away for a couple weeks but I'm not keen on how it turned out, maybe I'll make her a wall hanging instead LOL.


And finally.... it's been a long one hasn't it!! One of the managers at my sons football club managed to break his leg playing football of all things so a quick get well card was in order.


So that's me and April done...phew! I've tried to keep the blurb to a minimum.

Thanks for stopping by and leave a message if yo fancy.

Happy craftin
Rebecca


Thursday, 14 April 2016

Play Date...Altered Book

Well hello! How the devil are you all?

To cut a long story short...having been made redundant at the end of March and getting a new job I have been left with a week in limbo between the two....

I mean what's a girl to do other than contact her craftin mucka and say 'lets get together!' I'm sure we have both mentioned before that we had an evil plan to get together for a crafty session each half term but as I will be working more hours in the new job this might be harder work so we took advantage...

You know the scene out of  The Jungle Book with the vultures (which I still say to this day are The Beatles! Warped mind I know) 'What we gonna do?' 'I dunno what do you wanna do?' etc...

Sue said how about an altered book, O Yeah!

So off I went and after what seemed forever we had cut an aperture from the middle of the book to add a little something and start decorating. Although we started on the same vein somewhere along the line we ventured along different paths and at one point both sat there, (probably with an inane grin on our faces) bathing in the silence, just happy in our little craftin world and thinking how lovely it was that we were both doing the same thing completely different LOL. O joy! There's only craftin people that will understand these ramblings of a mad crafter LOL!

So the inside pages:

I used PaperArtsy Fresco paints slate and claret to dry brush some colour onto the pages and then added some fabric and beads and stuff to the corners of the aperture and eventually decided to paint the whole of the aperture in claret and adding my heart locket and silhouette. I also stamped multiple rows of the houses from my PA challenge winnings HP1601 onto tissue paper and stuck those on the opposite page. Unfortunately the picture showing both pages together won't rotate no matter what I try!!


The front cover:

I adhered some angel hair paper to the front for texture and Sue being Sue had die cut some bits and bobs that we might be able to use so I coloured one with more slate and stamped brick effect with PA mini MN95.

To the other die cut and hinges I added texture paste from Sue's stash (sorry can't remember which one) but it's a super charcoal colour with sparkle.

I added some more fabric and hessian lace and colouerd it all with claret, fortunately my book was already red so it didn't matter that this is translucent. I coloured some more fabric in the slate to bring it altogether added some glass beads finally added my street sign and lamp and rubbed a little Ruby treasure gold to highlight some of the texture.


Unfortunately the inside covers were blue and all I could see was glimpses of blue so I decorated this too...as you do! I just love this Tim Holtz stencil. Again using slate and claret with vintage lace and mushroom as my neutrals.


Can you believe that I actually finished and blogged before Sue?....No nor me, mind I think mine is quite simple in design where I am sure Sue's will be full on texture and lots more detail (I only saw the inside complete and the front was at the thinking/placing stage before I had to go on school run LOL but it did look good).

Now I still have 4 cards to make during April so I better get a lick on then as I need to start decorating the living room with the rest of my week 'off'!! and maybe the hubby will take pity and help even with his bad shoulder!

Right that's me done! Thanks for stopping by and leave a comment if you fancy.

Happy Craftin

Rebecca


Saturday, 9 April 2016

March...check

So how are we all this fine true to form showery April day?

March brought two anniversaries (one, a big achievement) and one birthday, now I really struggled with the first one, it was my friends 13th wedding anniversary so I had 'teenager' going through my mind (I remember this well as I was 8 months pregnant at their wedding with our youngest who will obviously be a teenager this month). 

So I'm thinking Stampotique buddies and grungy, I chose purple as a base as that was the colour of the invites I made for them...probably too much thinking a not enough just getting on with it me thinks, which is what was making it hard work but I got there in the end by NOT thinking about it LOL.


Now on to my Aunt & Uncle's 60th wedding anniversary, I made them a canvas and card using scanned images of their wedding photos. 

For the card I made a pretty pink and purple master board, not my usual colour scheme but it was pretty. Now some of the more observant will notice the typo on the card, I couldn't believe it, never even noticed until my other Aunt pointed it out!!! O well just makes it more original right!!


With the canvas I also included photos of their Grandson's wedding from a couple years ago and used the colours from the lovely hats as the basis for my colour scheme. Anyway they loved the card (typo and all!) and the canvas, so all good.


And finally... a card for a friend to finish the month off but I was a little late with it as I hadn't allowed for the bank holiday postage...Arhh!


Well that's March wrapped up and I'll see you next time.

Thanks for stopping by and leave a message if you fancy.

Happy craftin

Rebecca


Friday, 18 March 2016

2016 Topic 5:Art Dolls {Challenge}...

...or time flies...

Well Hello! How are we all this fine Friday evening, had a glass of something yet?

Anyhow, over on the PaperArtsy blog the latest challenge is Art Dolls, now I must admit when I saw this I rolled my eyes and squirmed, I'm sorry but some of these you see on the internet really FREAK me out. However, having read through the blog post and after watching the first video I felt quite inspired, which at the end of the day is what it's all about isn't it.

So a quick get together with my mucka Sue and last Friday we set about making an art doll based on the idea in said video, go check Sue's out it's awesome!

Now a couple or three Christmases ago we started a clock project but never finished them so decided to utilise these within our art dolls. When I grabbed mine I wasn't happy with it though so set about painting with fresco paints and crackle glaze, I went a bit subtle for this (not the norm for me).

Silence fell as we contorted with the wire as it really does have a mind of it's own! Sue went for the tall and slender look whilst I went the short rotund look (I'm saying nothing!) mine reminded me of the Robot film, you know the one with the big bum!

Now Sue finished hers quite quickly at home after leaving, whilst I still had loads to do but I did eventually finish but had to keep waiting for glue to dry the heavy items in place before moving onto the next stage.

Now Sue being really organised made us some faces from paper clay using her daughters old Barbie dolls as the mold, I inserted mine into a Tim Holtz pocket watch (that I bought years ago and never used but it keeps it in the theme of time) and added accent beads.

If my dad were still with us he would have been 79 Tuesday so I thought I would use his old pocket watch (it's not valuable and not worked for years) as the focal point inside the clock and popped one of Lin Browns flowers as a back drop having stamped it onto my paint mop up paper. Enough waffling here's a pic of the final project.


I used a mixture of Fresco Vintage Lace, Squid Ink and Claret and Lin Bowns ELB24 with lots of ribbon and lace and flowers with other bits and bobs here are some other views.


So that's me done, I survived what has been a crap week and a big thank you to my mucka Sue as she popped in yesterday with some flowers... arr bless!


Thanks for stopping by and leave a message if you fancy and please can you take pity on me and at least one other someone follow me as I'm still Billy One Mate LOL

Happy Craftin
Rebecca


Sunday, 28 February 2016

Just a Journal Page

Hi Peeps, how's it going?

Well it's been a bit hard work here the last couple weeks, you know how it is sometimes things don't wash over you the way they should. So what's a girl to do?

CREATE that's what. Now I've been to a couple of France Papillon journal classes and she really lives the emotional side of crafting, now I've never quite got there but I think she would have been proud of my thought process with this LOL.

For anyone who knows me I don't 'do' black, either in my crafting (other than bits of accent you know!) or clothing, I find it a depressing colour and always try and be colourful in crafting and thought.

SO I started this with a layer pf black gesso because that's how I felt but as soon as I started to think about what I wanted to do I had to use colours but still wanted to show some black as that's where I'd come from (does that make sense?) 


I used a stencil to ink up and heat emboss in clear embossing powder then as this stencil reminded me of peacock feathers (it probably isn't that but what the heck!) it had to be blues and (my favourite) greens with PaperArtsy fresco paints China & Granny Smith. I then wiped the paint from the embossed areas to show the bits of black!

A bit more stenciling with some grunge paste too ad some highlighting and shadowing with pencils, but I needed it to say something and came across a JOFY sentiment on a scrap of tissue paper however the text says 'hear the song within the silence' but I changed silence to chaos (as you do).

I had to give this a wash of South Pacific as after it dried it was still white for some reason.


Anyhow I'm not sure about the emotional side but I certainly felt better after creating this, I really think it's the time spent just thinking about something else though but hey jump in and enjoy.

Thanks for stopping by and leave a comment if you fancy, and now I've found the follow button again I might not be 'Billy No Mates' if you choose to follow me, go on be a dare devil LOL.

happy Craftin
Rebecca


Wednesday, 17 February 2016

2016 Topic 3: Wax {Challenge}

Oooo hark at me! Two posts in one month, how about that then!!

Over on the PaperArtsy blog is a new challenge...all about wax!!

So, many many moons ago whilst in Richmond visiting my brother we happened across a craft fair in the town hall (I think anyway, it was a long time ago).

Anyhow, there was this artist chappy selling and demoing Caustic Art with little blocks of wax and an iron... how strange I thought, but I was hooked and bought a starter kit and as I was his only customer all day he threw in some beeswax too for good measure.

I did play at the time and made a few projects but since then said kit has been sat longingly just waiting to be played with again! 

My mind was racing when I saw the PaperArtsy blog 'Where O where is may wax?' I found a couple books with bits of waxy delights in and obviously there was the design team inspiration on the PaperArsty blog.

Now the kids are off this week but my working from home job as been inundated, poor kids have been left to their own devices, not that they are moaning as I've been a taxi to the big un and the little un has been happy on his X-Box with the odd nag of getting some fresh air to come along on dog walking expeditions!!

I seem to be waffling tonight sorry...

I melted some beeswax onto my travel iron! and scraped across the surface, then dipped some paper in the wax still on the iron to adhere this to the board. Now some people might be a bit daft and get wax on their fingers here!!! I tried to iron over the layers but they just seems to slip around a bit. I decided to add some colour, with yellow, green then a few drops of blue and a dash of red. 

I then stamped Lin's lovely flower head from ELB24 stamp set onto tissue paper and adhered that but when I tried to fix that, the colours underneath all ran and mixed together and although the colours were Ok it's seemed a bit of a mess, so what to do?

After a while I used the white wax to colour in the petals and used the tip of the iron to melt this which diluted the colours, I liked this a repeated a couple more times and thought I'd leave this experiment there.


So as quick experiment it's OK, I think and it was good for the wax to see the light of day, although I wouldn't leave them in the light otherwise it would be...
'Ahh! I'm melting.....'

Sorry couldn't resist, bit long winded for a quick experiment LOL Sorry!

Thanks for stopping by and leave a message if you fancy.

Happy craftin
Rebecca